元々、Adguard Homeを仮想サーバー(proxmox)上に構築していましたが、仮想サーバーが止まった時のリスクを考えて冗長化しておきたいと思っていました。今回は、追加でOpenWRT上にAdguard Homeを構築して同期したので記録しておきます。
概要
今回は、OpenWRTにUSBメモリを付けてExroot化した上で、Adguard Homeをインストールしたものを作成。元々Proxmox上のAlpine Linuxに構築していたAdguard HomeからAdguard-syncにて同期を行います。
手順は、以下の通り
- ルーターにOpenWRTをインストール(WN-AC1600DGR3)
- USBメモリを接続し、Exroot化(ついでにSwap領域も作成)・・・今回はここまで
- USBをExroot化したOpenWRT上にAdguard Homeをインストール
- Proxmox上のAlpine Linux上にAdguard-syncをダウンロード・設定
OpenWRTのインストール
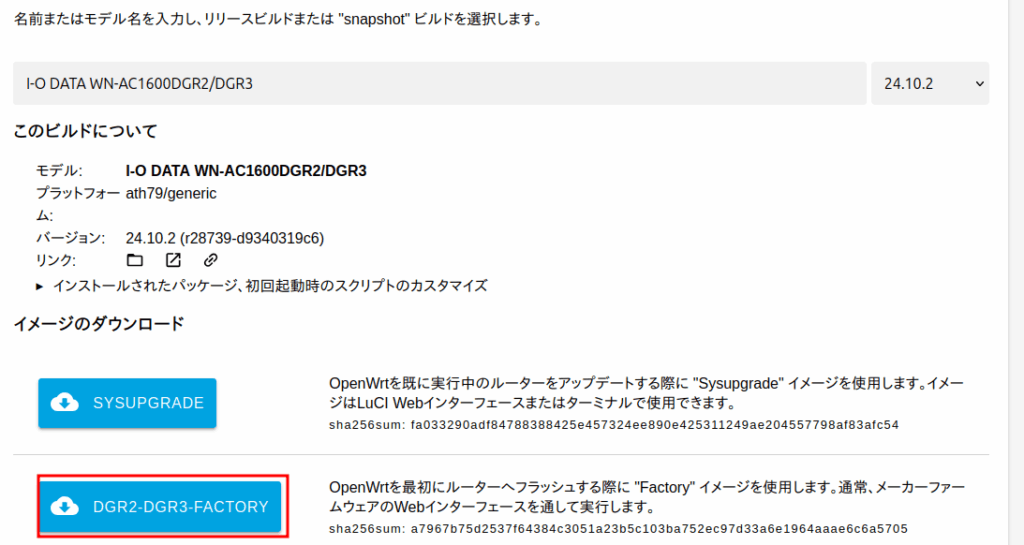
今回は、USBを利用できる機種でOpenWRTを簡単に導入できそうなものを検索し、中古で購入したI-O Data – WN-AC1600DGR3を利用しました。インストールは簡単で、メーカーのファームウェアアップデートからfactory.binを設定して流してやるだけ。DGR3の情報が少なかったので不安はありましたが、I-O DATA WN-AC1600DGR2/DGR3という、DGR2と共通のファイルでできました。
最近は以下のページ(TOH:Table Of Hardware)で対象のハードウェアを簡単に検索できるようになりました。(軽くて便利です)
https://toh.openwrt.org/?view=normal
ちなみに2025.8時点では、最新が、openwrt-24.10.2-ath79-generic-iodata_wn-ac1600dgr2-squashfs-dgr2-dgr3-factory.binでした。
初期状態では、領域が少なく、Flash(電源を切ってもデータが消えない不揮発性メモリ。OS本体、設定ファイル、インストールされたパッケージなどがここに保存)が16MiBでRAM(電源を切るとデータが消える揮発性メモリ)が128MiBです。
次にUSBを接続し、Exroot化します。
USBのExroot化
Exroot化とは、一言で言うと、Openwrtで/(ルート)ファイルシステムを拡張し、USBの領域を使用できるようにするものです。私の持っているOpenWRTのルーターでは、利用できる領域が少なく、そのままでAdguardHomeをインストールするのは難しいので、Exroot化します。
以下の公式HPで手順を確認します。

OpenWRTのファイルシステムは難しくてきっちりと理解しきれてませんが、概ね理解したところを記載したExroot化前後の構造になります。
| No | Partition | Mount Point | Writable | 備考 |
| 1 | rootfs | /rom | No | フラッシュメモリに保存(SquashFS)ファームウェア本体(OSのコア部分、基本的なコマンド、プリインストールされたパッケージ) |
| (2) | (rootfs_data) | (/overlay) | (Yes) | フラッシュメモリに保存。(設定変更、追加したパッケージ、作成したファイルなどを保存) |
↓ Exroot化
| 2 | ext4 | /overlay | Yes | USBで拡張したパーティション(ext4) |
OverlayFS
| 3 | overlay | / | Yes | OverlayFSで作られた論理的な構造(1と2を重ねて一つの/(ルート)とする。) |
元々は、OverlayFS によって、rootfs と rootfs_data を1つに重ね合わせて、全体として / (ルート)という一つの読み書き可能なファイルシステムとして機能しており、ユーザーは / (ルート) ファイルシステムを通じて、読み取り専用の/rom(rootfs)の読み込み、また、読み書き可能な /overlay (rootfs_data)パーティションにデータを書き込むことができるようになっています。
Exroot化とは上記のrootfs + rootfs_dataで1つの/(ルート)ファイルシステムだったもののうち、rootfs_dataを外部ストレージ(USBでext4)に切り替え、1つの/(ルート)ファイルシステムとして扱うものです。
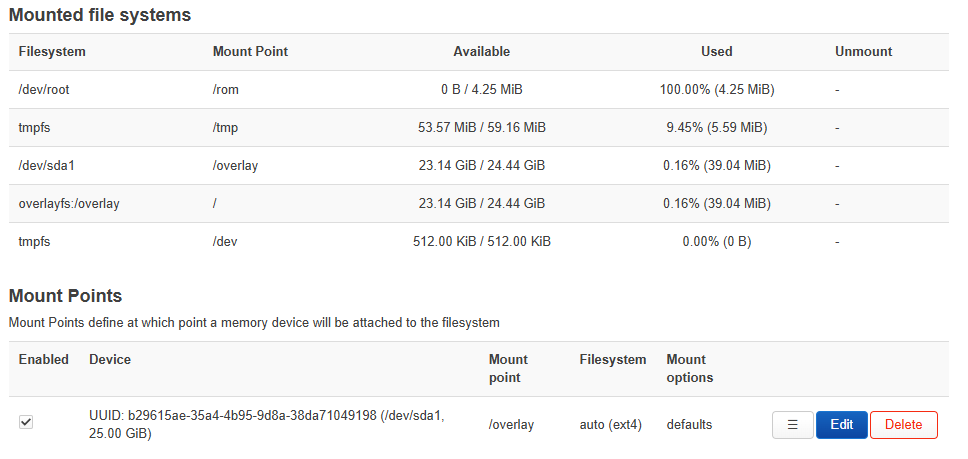
Luci上での設定後の状況(System→Mount Points)
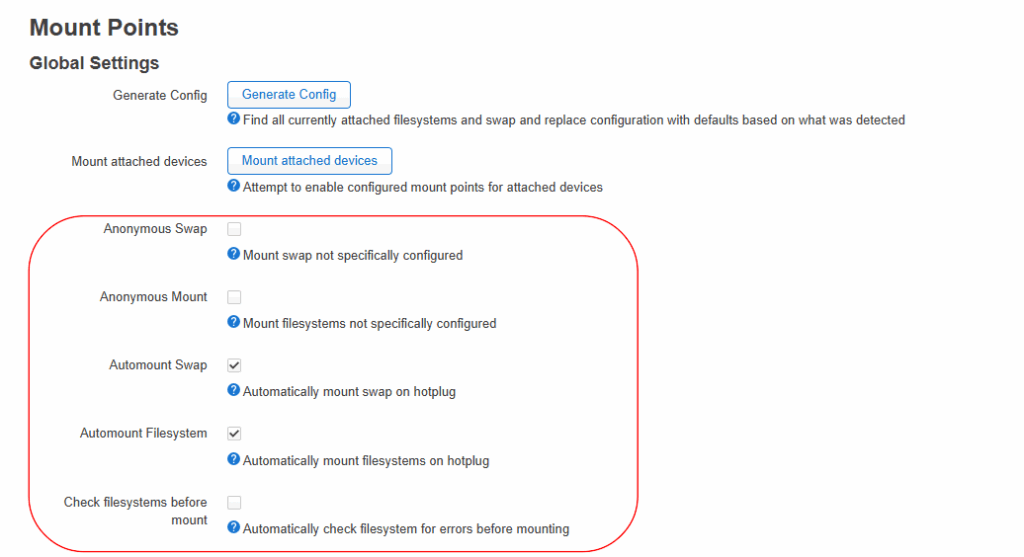

上記はfstabの内容を表示していると思われます。
# cat /etc/config/fstab
config global
        option anon_swap '0'
        option anon_mount '0'
        option auto_swap '1'
        option auto_mount '1'
        option delay_root '5'
        option check_fs '0'

config mount
        option target '/overlay'
        option uuid 'b29615ae-35a4-4b95-9d8a-38da71049198'
        option enabled '1'

config swap
        option device '/dev/sda2'
        option enabled '1'
準備
手順を読むと、Luciからでも出来るとのことですが、sshから実施する事を前提としています。私は、一度Luciで設定しましたがうまくいったのかわからなかったので再度コマンドでやっています。
手順の例の通り、ext4ファイルシステムとしてExrootを作成します。
まずは、必要なパッケージをインストールします。
# opkg update
# opkg install block-mount kmod-fs-f2fs e2fsprogs fdisk
パーティション分割とフォーマット
インストールした fdiskコマンドを使って、外部 USB ストレージを Extroot 用にパーティショニングし、ext4にフォーマットします。実行結果の画面は一部異なっているかもしれません。
## 対話型fdiskコマンド
# fdisk /dev/sda

## add a new partition(Exroot用)
Command (m for help): n
Partition type
   p   primary (0 primary, 0 extended, 4 free)
   e   extended (container for logical partitions)
Select (default p):p
Partition number (1-4, default 1):1
First sector (x-xxxxxxxx, default x):
Last sector, +sectors or +size{K,M,G,T,P} (x-xxxxxxxx, default xxxxxxxx): +25G
Created a new partition 1 of type 'Linux' and of size 25 GiB.

## add a new partition(Swap用)
Command (m for help): n
Partition type
   p   primary (1 primary, 0 extended, 3 free)
   e   extended (container for logical partitions)
Select (default p):p
Partition number (2-4, default 2):2
First sector :(x-xxxxxxxx, default x):
Last sector, +sectors or +size{K,M,G,T,P} : +3G
Created a new partition 2 of type 'Linux' and of size 3 GiB.
## 2つ目のpartition labelをLinux swapに変更
Command (m for help): t
Partition number (1,2, default 2): 2
Hex code (type L to list all codes): 82
Changed type of partition 'Linux filesystem' to 'Linux swap'.
## 変更を保存
Command (m for help): w
The partition table has been altered.
Calling ioctl() to re-read partition table.
Syncing disks./dev/sda1をext4にフォーマットし、sda2をswap用のセクションとして準備
## /dev/sda1をext4でフォーマット
# mkfs.ext4 /dev/sda1

## swap用セクションの準備
# mkswap /dev/sda2
設定の確認
#/etc/config# fdisk -l
~略~
Disk /dev/sda: 28.67 GiB, 30784094208 bytes, 60125184 sectors
Disk model:  SanDisk 3.2Gen1
Units: sectors of 1 * 512 = 512 bytes
Sector size (logical/physical): 512 bytes / 512 bytes
I/O size (minimum/optimal): 512 bytes / 512 bytes
Disklabel type: dos
Disk identifier: 0xc80aa7a2

Device     Boot    Start      End  Sectors Size Id Type
/dev/sda1           2048 52430847 52428800  25G 83 Linux
/dev/sda2       52430848 58722303  6291456   3G 82 Linux swap / Solaris
データの転送
元もとあったrootfs_dataの内容を外部USBにコピー
## /dev/sda1を/mntにmount
# mount /dev/sda1 /mnt

## 現状のoverlayパーティションの内容を、マウントした外部USBストレージ/mntへコピー
# tar -C /overlay -cvf - . | tar -C /mnt -xf -

## アンマウント
# umount /mnt
fstabの設定
fstabファイルを作成し、編集
 # block detect > /etc/config/fstab

## /etc/config/fstabファイルを編集
# vi /etc/config/fstab
config global
        option anon_swap '0'
        option anon_mount '0'
        option auto_swap '1'
        option auto_mount '1'
        option delay_root '5'
        option check_fs '0'

config mount
        option target '/overlay'
        option uuid 'b29615ae-35a4-4b95-9d8a-38da71049198'
        option enabled '1'

config swap
        option device '/dev/sda2'
        option enabled '1'
rebootする
# reboot以上でExroot化は完成です。次回は、Adguard Homeのインストールとsync設定です。
参考情報
MTDパーティションの設定を確認したので参考に残しておきます。
MTDは、Memory Technology Deviceの略で、ルーターなどの組み込み機器で使われるフラッシュメモリのパーティション情報。Linuxカーネルが管理しているMTDデバイス(フラッシュメモリ)の一覧と、それぞれのパーティション情報を表示する仮想ファイルです。このファイルを参照することで、ファームウェアが保存されているフラッシュメモリがどのように分割されているかを確認できます。
OpenWrtが動いているルーターのフラッシュメモリは、用途に応じて複数の論理的な領域に分割されており、それぞれがmtd0、mtd1といった形で番号付けされます。
これらのパーティションの役割は、ルーターの機種やファームウェアによって異なりますが、一般的な構成は以下のようになります。

MTD番号	よくある用途
mtd0	ブートローダー(U-Bootなど)
mtd1	ファームウェア情報(設定やバージョン情報など)
mtd2	カーネル(OSのコア部分)
mtd3	rootfs(読み取り専用のファイルシステム)
mtd4	rootfs_data(読み書き可能なデータ領域)
mtd5	予備領域や特定の設定保存領域など
root@OwtDGR3:~# cat /proc/mtd
dev: size erasesize name
mtd0: 00030000 00010000 "u-boot"
mtd1: 00010000 00010000 "u-boot-env"
mtd2: 00e50000 00010000 "firmware"
mtd3: 00280000 00010000 "kernel"
mtd4: 00bd0000 00010000 "rootfs"
mtd5: 007b0000 00010000 "rootfs_data"
mtd6: 00100000 00010000 "manufacture"
mtd7: 00010000 00010000 "backup"
mtd8: 00050000 00010000 "storage"
mtd9: 00010000 00010000 "art"## fdisk -l の一部抜粋
# fdisk -l
Disk /dev/mtdblock0: 192 KiB, 196608 bytes, 384 sectors
Units: sectors of 1 * 512 = 512 bytes
Sector size (logical/physical): 512 bytes / 512 bytes
I/O size (minimum/optimal): 512 bytes / 512 bytes
Disk /dev/mtdblock1: 64 KiB, 65536 bytes, 128 sectors
Units: sectors of 1 * 512 = 512 bytes
Sector size (logical/physical): 512 bytes / 512 bytes
I/O size (minimum/optimal): 512 bytes / 512 bytes
Disk /dev/mtdblock2: 14.31 MiB, 15007744 bytes, 29312 sectors
Units: sectors of 1 * 512 = 512 bytes
Sector size (logical/physical): 512 bytes / 512 bytes
I/O size (minimum/optimal): 512 bytes / 512 bytes
Disk /dev/mtdblock3: 2.5 MiB, 2621440 bytes, 5120 sectors
Units: sectors of 1 * 512 = 512 bytes
Sector size (logical/physical): 512 bytes / 512 bytes
I/O size (minimum/optimal): 512 bytes / 512 bytes
Disk /dev/mtdblock4: 11.81 MiB, 12386304 bytes, 24192 sectors
Units: sectors of 1 * 512 = 512 bytes
Sector size (logical/physical): 512 bytes / 512 bytes
I/O size (minimum/optimal): 512 bytes / 512 bytes
Disk /dev/mtdblock5: 7.69 MiB, 8060928 bytes, 15744 sectors
Units: sectors of 1 * 512 = 512 bytes
Sector size (logical/physical): 512 bytes / 512 bytes
I/O size (minimum/optimal): 512 bytes / 512 bytes
Disk /dev/mtdblock6: 1 MiB, 1048576 bytes, 2048 sectors
Units: sectors of 1 * 512 = 512 bytes
Sector size (logical/physical): 512 bytes / 512 bytes
I/O size (minimum/optimal): 512 bytes / 512 bytes
Disk /dev/mtdblock7: 64 KiB, 65536 bytes, 128 sectors
Units: sectors of 1 * 512 = 512 bytes
Sector size (logical/physical): 512 bytes / 512 bytes
I/O size (minimum/optimal): 512 bytes / 512 bytes
Disk /dev/mtdblock8: 320 KiB, 327680 bytes, 640 sectors
Units: sectors of 1 * 512 = 512 bytes
Sector size (logical/physical): 512 bytes / 512 bytes
I/O size (minimum/optimal): 512 bytes / 512 bytes
Disk /dev/mtdblock9: 64 KiB, 65536 bytes, 128 sectors
Units: sectors of 1 * 512 = 512 bytes
Sector size (logical/physical): 512 bytes / 512 bytes
I/O size (minimum/optimal): 512 bytes / 512 bytes
以下略